
You know that moment when guests walk into your party and their eyes light up at the sight of your dessert table? That’s the magic I live for! I still remember the first time I threw a baby shower and spent hours arranging mini cupcakes, chocolate-dipped strawberries, and a towering cake—my hands were sticky, my kitchen was a mess, but wow, was it worth it. A well-styled dessert table isn’t just about sweets; it’s a centerpiece that sparks joy and gets everyone talking. Whether you’re hosting a birthday, wedding, or just a cozy get-together, a little creativity with heights, colors, and textures can turn even store-bought treats into something unforgettable. Trust me, your guests will snap photos before they even take a bite!

Essential Dessert Table Ideas
Creating a showstopping dessert table is easier than you think—it’s all about playing with three magic elements: height, variety, and surprise. Here’s what I’ve learned from years of trial and error (and a few frosting disasters!):
- Go vertical: Use cake stands, stacked books (covered in pretty paper!), or even overturned bowls to create different levels. Your table will instantly look more dynamic.
- Mix textures: Pair smooth cheesecakes with crunchy biscotti or fluffy cupcakes with dense brownies. Contrast keeps people coming back for “just one more bite.”
- Hide little surprises: Tuck small treats like chocolate-dipped spoons or mini macarons between larger items. Guests love discovering these hidden gems!
And here’s my secret weapon: always include something interactive—a DIY s’mores station or a make-your-own sundae bar gets everyone giggling and breaks the ice.
Choosing a Theme
Picking a theme is like giving your dessert table a personality! My favorite part? You don’t need to spend a fortune—a simple color scheme or seasonal touch can work wonders. Last summer, I draped a blue tablecloth and scattered seashells around lemon bars for an instant beach vibe. Some foolproof ideas:
- Seasonal: Pumpkin everything for fall, pastel eggs for spring
- Color bomb: All pink for a bridal shower, rainbow layers for kids
- Nostalgia: Retro candy buffet with rock candy and ribbon sandwiches
Pro tip: If you’re overwhelmed, start with just two complementary colors and build from there. My go-to? Dusty rose and gold—it makes even supermarket cookies look fancy!
Dessert Selection
Here’s where I get giddy—the sweets! The key is offering a mix that feels abundant but not chaotic. I always include these categories:
- One showstopper: A decorated cake or towering croquembouche
- Two handheld treats: Cupcakes, whoopie pies, or cookie stacks
- Something fruity: Berry tarts or chocolate-covered pineapple
- Bite-sized options: Truffles, petit fours, or mini cheesecakes
Texture is crucial—I learned this the hard way when I served all soft desserts at my aunt’s anniversary. Now I always include crunch, whether it’s almond brittle or shortbread cookies. And don’t forget the visual variety! Alternate round cakes with square brownies and irregular-shaped meringues for that “Instagram-worthy” look.
Ingredients for a Stunning Dessert Table
Let me tell you, the secret to a jaw-dropping dessert table isn’t just about the sweets—it’s about having all the right tools ready to go! After hosting more parties than I can count, I’ve narrowed it down to these essentials that’ll make your life so much easier. Trust me, running to the store mid-setup because you forgot cupcake stands is no fun (been there!).
Desserts
You’ll want about 3-5 different types of desserts for variety—I usually plan for 2-3 pieces per guest. My must-haves:
- A centerpiece cake (6-8 inches feeds about 20)
- 24+ mini cupcakes (people love grabbing these!)
- Assorted cookies (about 3 per person)
- Chocolate bark or truffles in a bowl (they disappear fast!)
Decorations & Serving Tools
These little helpers make all the difference:
- 3-tier stand (my most-used investment!)
- Small cake plates for individual treats
- Pretty napkins (get extra—they always go quick)
- Tongs and mini spoons for messy treats
How to Set Up Your Dessert Table
Alright, let’s get our hands dirty—or should I say, sticky? Setting up a dessert table is like conducting a sweet symphony. You want every element to shine while working together beautifully. Here’s my foolproof method that’s saved me from many last-minute panics!
Arranging Desserts
First rule: start tall and fan out. Place your showpiece (like a cake or tiered stand) slightly off-center at the back. Then work forward with medium-height items on cake plates, keeping lower treats like cookies at the front. Leave breathing room—crowding makes everything look messy. My trick? Use small overturned bowls under the tablecloth to create instant levels. And rotate platters so some face diagonally—it adds movement and makes serving easier!
Adding Decorative Touches
Now for the magic! Tiny details transform a table from “nice” to “whoa!”:
- Twinkle lights draped underneath the tablecloth create a gorgeous glow
- Handwritten chalkboard labels add charm (Bonus: cover any mistakes with doodles!)
- Fresh herbs or edible flowers make even store-bought desserts look gourmet
My favorite finishing touch? A mini “menu” card listing all treats—guests love knowing what’s gluten-free or contains nuts before diving in!
Pro Tips for a Perfect Dessert Table
After years of hosting (and a few dessert table disasters!), I’ve picked up some game-changing tricks that’ll make your spread look professional while keeping stress levels low. The best part? Most of these cost nothing—just a little creative thinking!
Portion Control
Here’s my golden rule: smaller is better. Mini cupcakes, bite-sized brownies, and petit fours let guests sample everything without guilt. I aim for treats no bigger than two bites—this way, people try more varieties, and you avoid half-eaten desserts cluttering the table!
Dietary Considerations
Always include at least one clearly labeled option for common dietary needs. A simple fruit platter, gluten-free macarons, or vegan chocolate bark shows thoughtfulness. Pro tip: Use colored toothpicks or separate trays to prevent cross-contamination for severe allergies.
Nutritional Information
Okay, let’s be real—when you’re staring at a gorgeous dessert table, nutrition isn’t exactly top of mind! But since we’re being responsible hosts, here’s the scoop: these values are rough estimates per serving and will vary wildly based on your specific ingredients and brands. A mini cupcake might hover around 200 calories, while that chocolate-dipped strawberry? Maybe 50. My advice? Enjoy everything in moderation…then go back for seconds of your favorites!
Frequently Asked Questions
Over the years, I’ve gotten the same excited questions from friends and family about dessert tables—so let me save you some panic with my hard-earned wisdom!
How Far in Advance Can I Set Up?
I like to assemble my dessert table 1-2 hours before guests arrive. Any earlier, and your perfect frosting might sag! Non-perishable items can be arranged first, then pop in delicate treats last minute. Pro tip: Keep a spray bottle of water nearby—a quick mist refreshes cookies and cakes that dried out while waiting.
What If I Run Out of Desserts?
Always have a secret stash in the kitchen! I freeze extra cupcakes or keep a batch of slice-and-bake cookie dough ready. If disaster strikes, raid your pantry for pretty chocolates or fruit—arranged nicely, they’ll look intentional. (Confession: I once turned leftover doughnuts into a “midnight snack” station when my cake flopped!)
Final Thoughts
There you have it—all my messy, joyful secrets for creating a dessert table that’ll have your guests swooning! Remember, perfection is overrated—some of my favorite setups happened when I improvised with mismatched plates and extra sprinkles. Now go dazzle your friends, and don’t forget to tag me in your photos—I live for seeing your sweet creations!
Print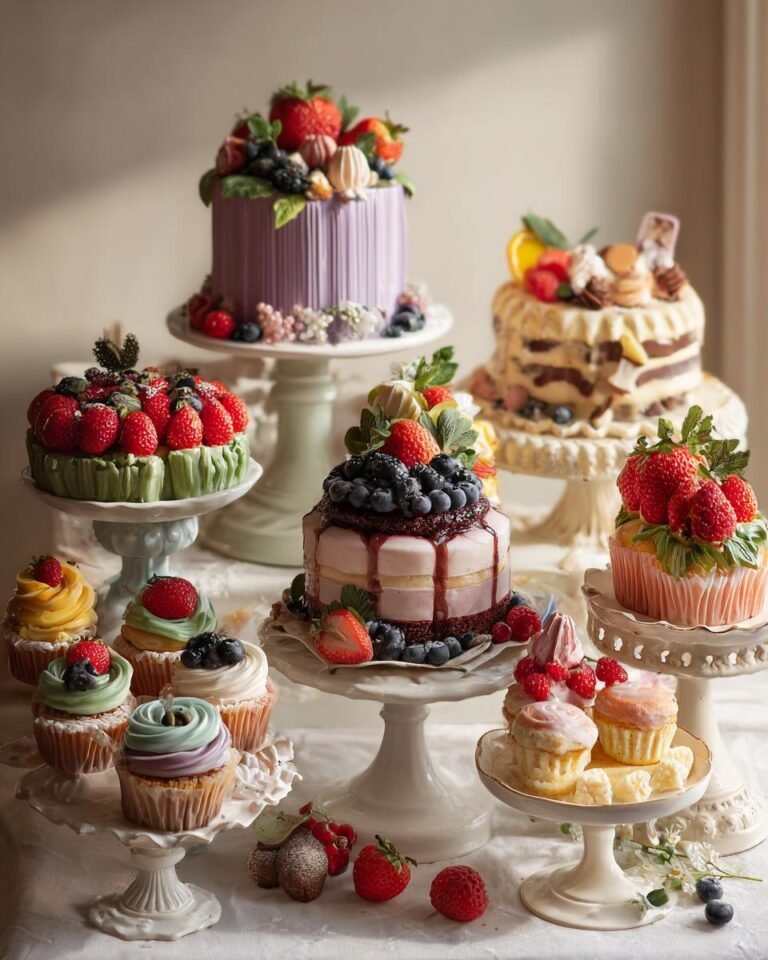
3 Stunning Dessert Table Ideas That Wow Every Guest
Creative ideas for setting up a dessert table that impresses your guests.
- Total Time: 3 hours
- Yield: Serves 20
Ingredients
- Assorted desserts (cakes, cupcakes, cookies)
- Decorative stands and trays
- Fresh fruits for garnish
- Candies and chocolates
- Sprinkles and edible decorations
- Napkins and dessert plates
- Serving utensils
Instructions
- Choose a theme or color scheme.
- Arrange desserts at different heights using stands.
- Add decorative elements like flowers or banners.
- Label each dessert clearly.
- Ensure easy access for guests.
- Keep backups for popular items.
Notes
- Balance flavors and textures.
- Keep portion sizes small.
- Consider dietary restrictions.
- Use lighting to highlight desserts.
- Refresh the table as needed.
- Prep Time: 1 hour
- Cook Time: 2 hours
- Category: Dessert
- Method: Assembling
- Cuisine: International
- Diet: Vegetarian
Nutrition
- Serving Size: 1 portion
- Calories: 200
- Sugar: 15g
- Sodium: 50mg
- Fat: 8g
- Saturated Fat: 4g
- Unsaturated Fat: 3g
- Trans Fat: 0g
- Carbohydrates: 30g
- Fiber: 2g
- Protein: 3g
- Cholesterol: 20mg
Keywords: dessert table, party ideas, sweet treats, dessert display